For every Artists taking photos are very important especially those who are selling their handmade online whether you are not good on taking photos or a professional one it is also your job to practice some simple skills. Click and click, Edit-Edit and Posting the photos are usually we do, but do not forget it is also good to have a great shot of your works so your handmade will also amazingly stand out and not to put on a waste one. It is like what you photograph is what people see who or how good you are.
We know, not every Artist are afford to have a good camera like a camera of a professional but some people used a phone cameras only. Sometimes it is also a matter of Art by taking it passionately like when we are making our handmade. Since we are Artist and a Filipino, being artistic and practical are one of our attitudes. We can always make a way to made it beautifully.
So here’s our tips and DO-IT-YOURSELF.
But before the steps we wanted to share the important things you need to consider;
- A camera – we recommend a good or high quality camera; digital or a professional camera
- Lightbox – a useful tool especially for photographing small things, you can always buy or make your own light-box.
- Lightning – the most beautiful lightning you can find is the sun, however the weather doesn’t always cooperate especially if we have a bad weather one. But you can also buy a photography lights or lamps for taking a photos.
- Focusing & Shooting – by taking a shot you need to balance your lens or your camera. You can also buy a tripod for steadying your camera cos no matter how our hands are steady there is always a chance that it will blurred or shake your shots.
- Background – choose your best background; but if you notice on picturing a jewelry or an artwork they tend to use a white background so the artwork will always stand and not the background.
- Editing – sometimes we need to edit our images not to change the image, but it also help to lighted your image plus as an Artist we always wanted to put our name or your watermark on the photo. We know some people tend to theft your handmade photos that’s why some of you are putting a watermarks on the center or mostly where the artwork sees or over the images. But for the tips, we’ve learned that if you are an Artist or making your own mark by doing a handmade, do not or never put your watermarks where your handmade sees, cos your artwork will be unseen and the image of your artwork will spoiled as well. So preserved your handmade as fresh that never fades.
This tutorial is not about how to be a professional but is to make a light box of yours. It is also a great way on taking your handmade photos. So here’s the steps on making your own light-box.
Materials that you need on making
DIY LIGHT-BOX
- A box like a balikbayan box
- A hobby cutter or X-acto knife or a Scissor
- Glue or Tape
- Ruler and Pencil/Pen
- Card board / Paper / Fabric
- Semi-transparent white material like tracing papers, nylon, fabrics that are transparent or the katsa fabric.
STEP ONE: CUTTING
- Lay the box flat on your cutting matt or flat surface
- Using the ruler and pencil you need to form or draw a box line in all sides equally – to the top and the four sides of box body except for the bottom or the box butt. Essentially you want to cut a hole in all sides of the box. See the example image that we’ve found in google, just like that.
- Now cut those draw line to create a hole
STEP TWO: WRAPPING
- Before wrapping your light-box, do not forget to tape the box butt to make it closed
- After cutting those sides, we need to wrapped those sides by using the semi-transparent white materials
- Wrap the outside with semi-transparent white materials on all sides that you’ve cut using glue or tape
STEP THREE: SETTING-UP
- And we’re almost done. We need to set up the little light-box or studio that we’ve made
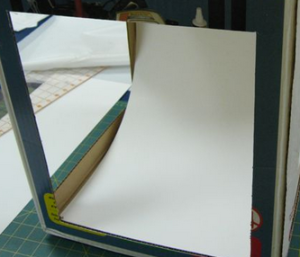
- You need to prepare a white card board or paper or a fabric; this will be your background
- Put your chosen background inside your light-box, it is also great if it’s fitted on the light-box
- Make sure your background inserted as a curve like a wave so there is no edges or line sees when taking a shot
- Prepare your light or photography lamp, you can have two or more lamp, lights side by side or much better if you experiment to see better results
- Ready your camera and take a shot
- And finally you have your own DIY LIGHT BOX!
Here’s the sample image in setting-up your background; (image sample are not owned by ArtNouveauPh)


